Project Structure
App_Resources
The App_Resources folder contains platform-specific resources of the application (icons, configuration files, native code, etc.). An application that supports both Android and iOS would therefore contain a subfolder for each platform (and a Windows subfolder when targeting Windows).
This page serves as a quick reference to understand how most settings in App_Resources affect the behavior and the look of a NativeScript app.
Android specific resources
On Android, many aspects of the default styling is controlled through various settings within the App_Resources folder.
Here we are showing the default look of a few elements (no custom styling applied) using the default values provided in App_Resources:
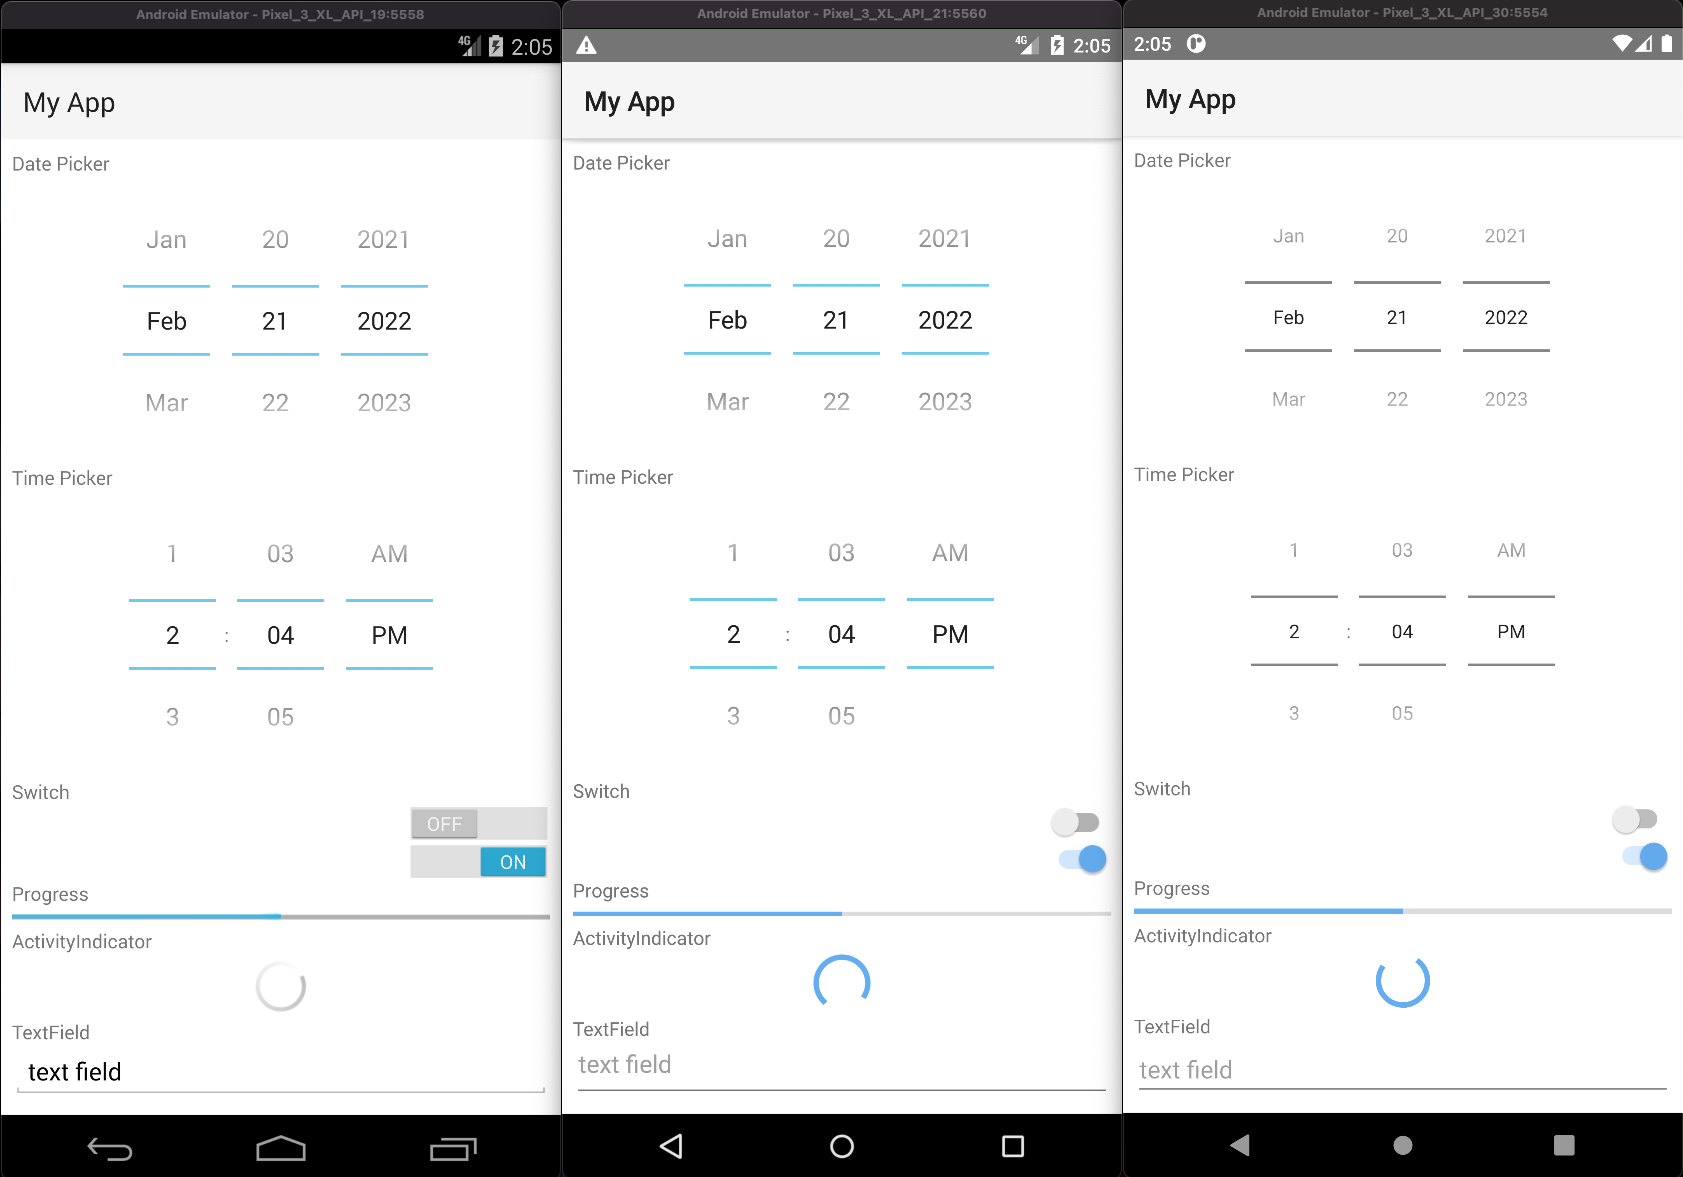
App_Resources/
├─ Android/
│  └─ src/main/res/
│     ├─ values/      # Default Values
│     ├─ values-v21/  # Values for API 21+
│     └─ values-v29/  # Values for API 29+
└─ ... more
Values can be overridden on specific API levels by making the changes in the corresponding directories.
Android app display name
App_Resources/Android/src/main/res/values/strings.xml
<?xml version="1.0" encoding="UTF-8" standalone="yes"?>
<resources>
  <string name="app_name">Your app name</string>
  <string name="title_activity_kimera">Your app name</string>
</resources>
Adding native code to an application
See Adding Java/Kotlin Code to an application
Setting the default color of the ActionBar
To change the default color fo the ActionBar, edit the ns_primary color inside App_Resources/Android/src/main/res/values/colors.xml:
<!-- The default color of the ActionBar -->
<color name="ns_primary">#65adf1</color>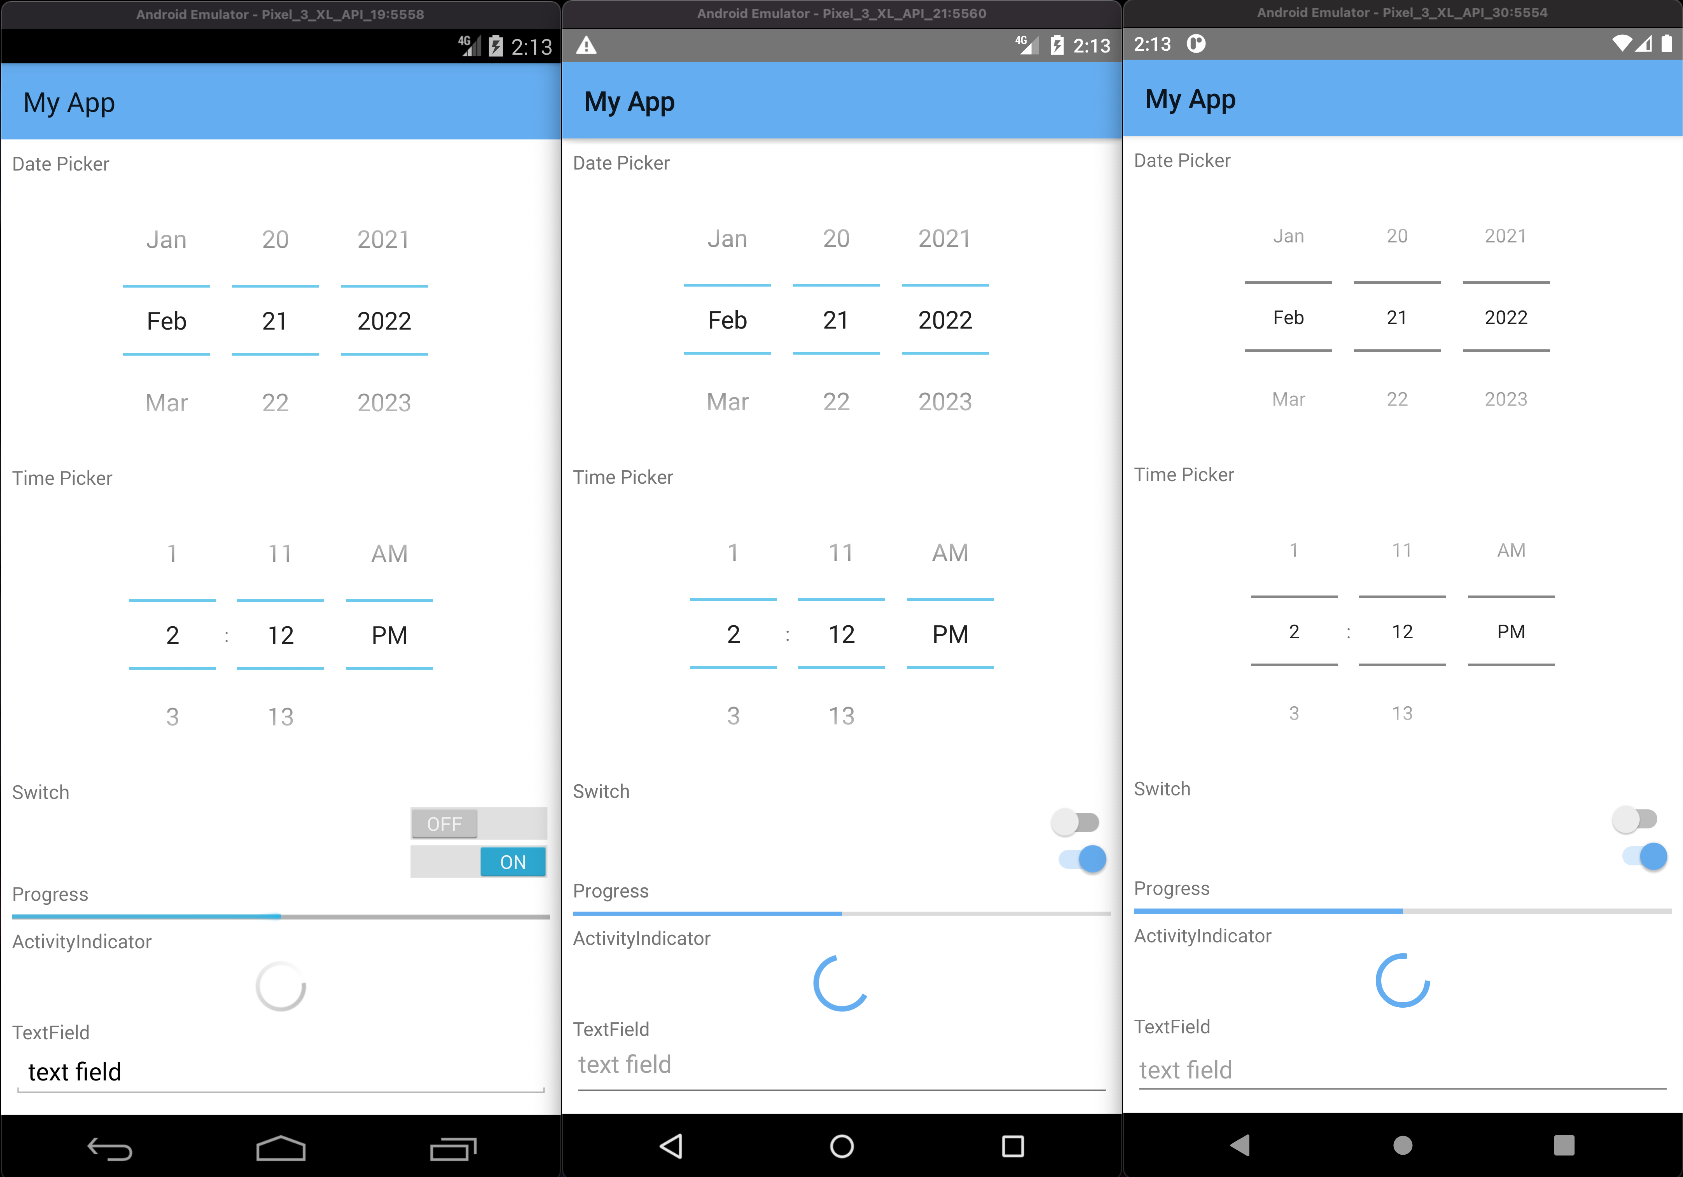
Setting the default color of the status bar
To change the default color of the status bar, edit the ns_primaryDark color inside App_Resources/Android/src/main/res/values/colors.xml:
Note
The color will be applied on API21+ since lower API levels do not support custom status bar colors*.
<!-- (API21+) The color of the status bar and contextual app bars; this is normally a dark version of colorPrimary. -->
<color name="ns_primaryDark">#65adf1</color>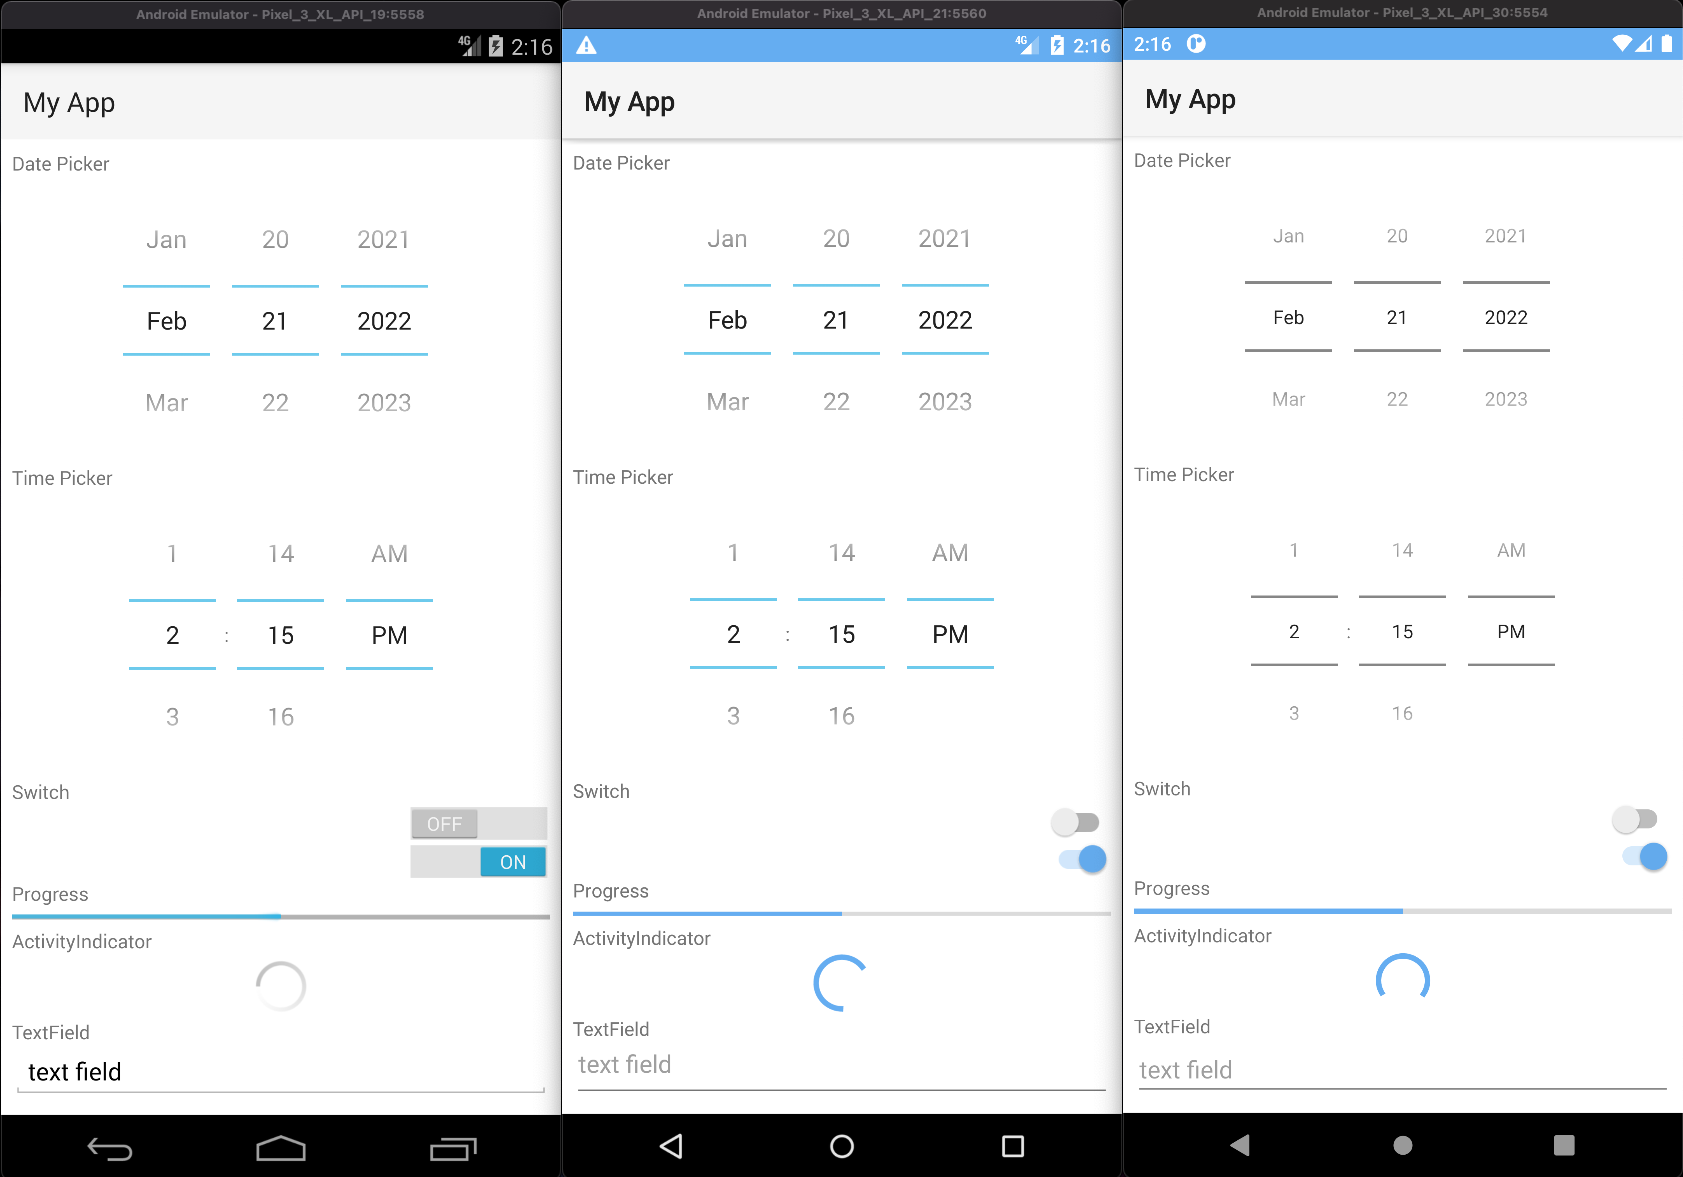
Setting the accent color
Various native elements have an accent color, which can be changed by setting the ns_accent color inside App_Resources/Android/src/main/res/values/colors.xml:
Note
The color will be applied on API21+ since lower API levels do not support custom accent colors.
<!-- The color of UI controls such as check boxes, radio buttons, and edit text boxes. -->
<color name="ns_accent">#059669</color>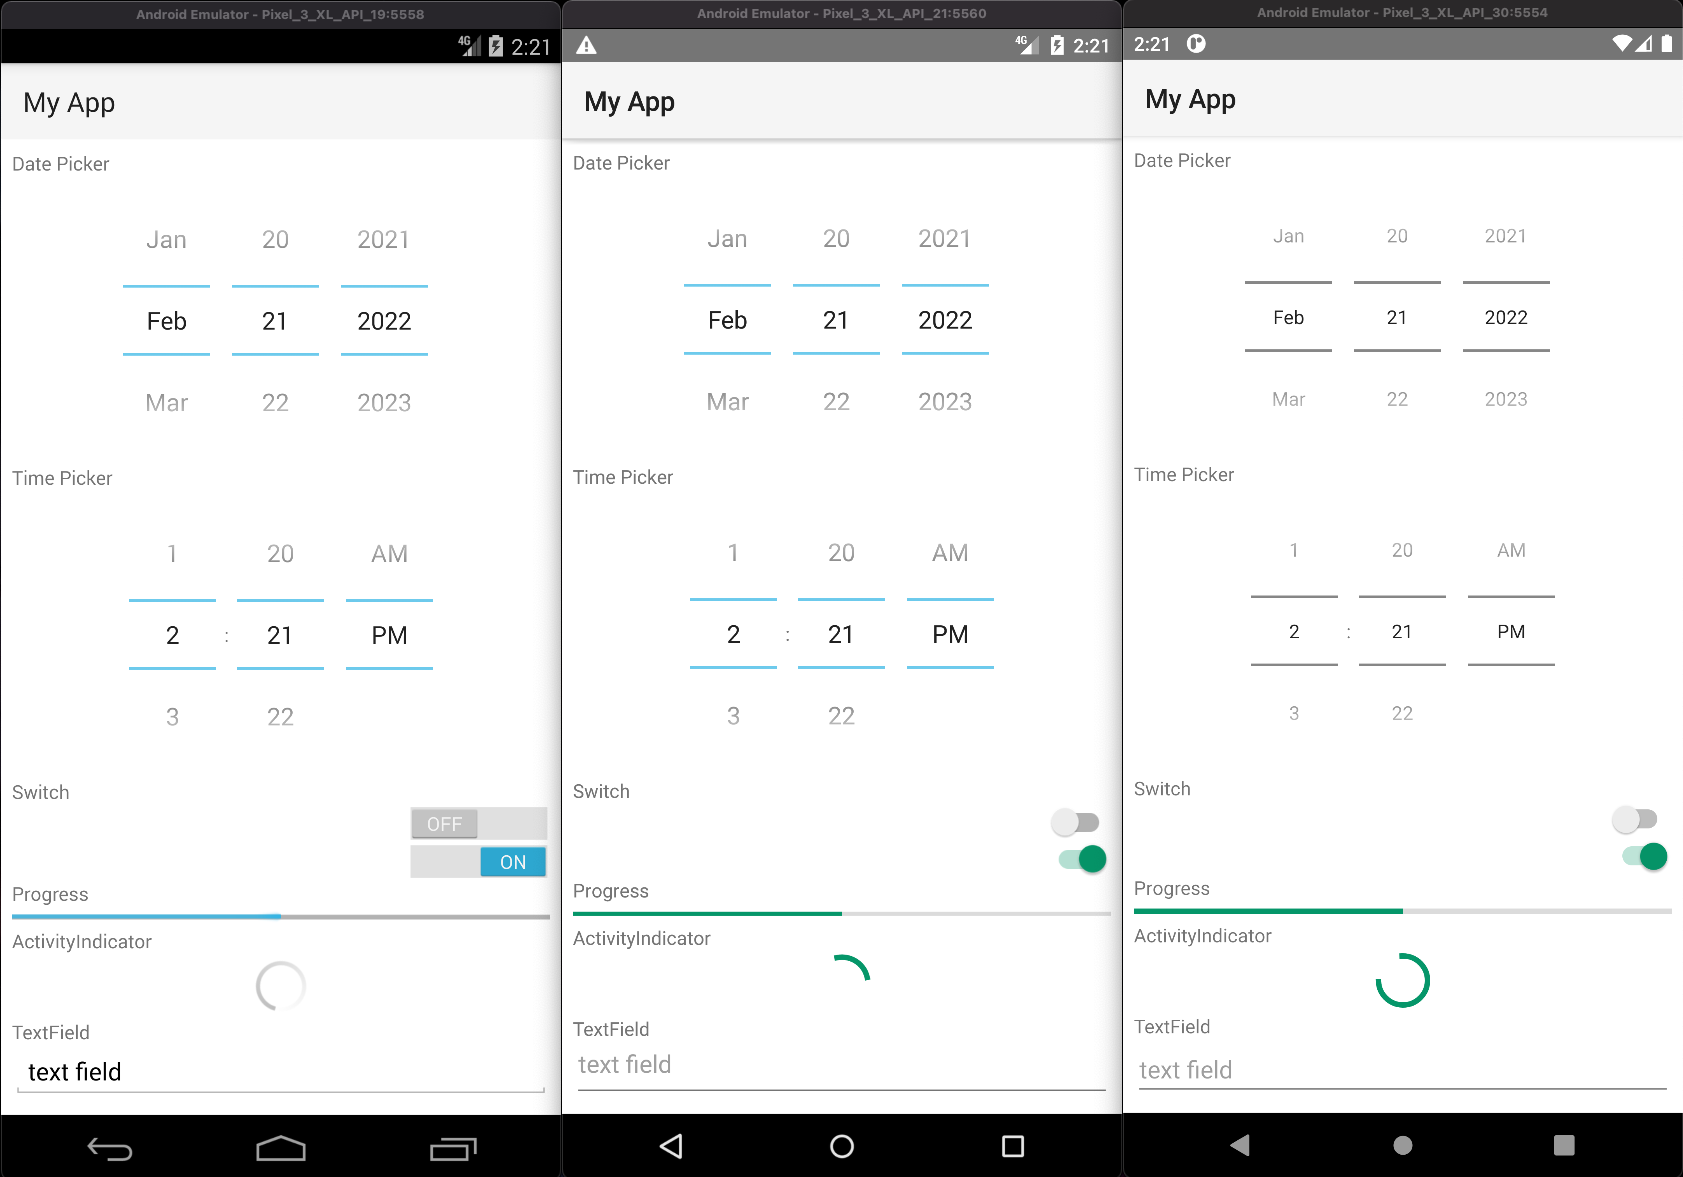
Showing the app under the status bar
The status bar can be made translucent and let the app flow underneath by uncommenting android:windowTranslucentStatus in AppThemeBase21 and android:paddingTop in NativeScriptToolBarStyle in App_Resources/Android/src/main/res/values-v21/styles.xml:
Note
We have added <color name="ns_primary">#65ADF1</color> to App_Resources/Android/src/main/res/values-v21/colors.xml to color the ActionBar.
<!-- Application theme -->
<style name="AppThemeBase21" parent="AppThemeBase">
  <!-- Uncomment this to make the app show underneath the status bar -->
  <item name="android:windowTranslucentStatus">true</item>
<!-- ... -->
</style>

<!-- ... -->

<style name="NativeScriptToolbarStyle" parent="NativeScriptToolbarStyleBase">
  <item name="android:elevation">4dp</item>

  <!-- Add padding to the ActionBar - useful when android:windowTranslucentStatus is set to true -->
  <item name="android:paddingTop">24dp</item>
</style>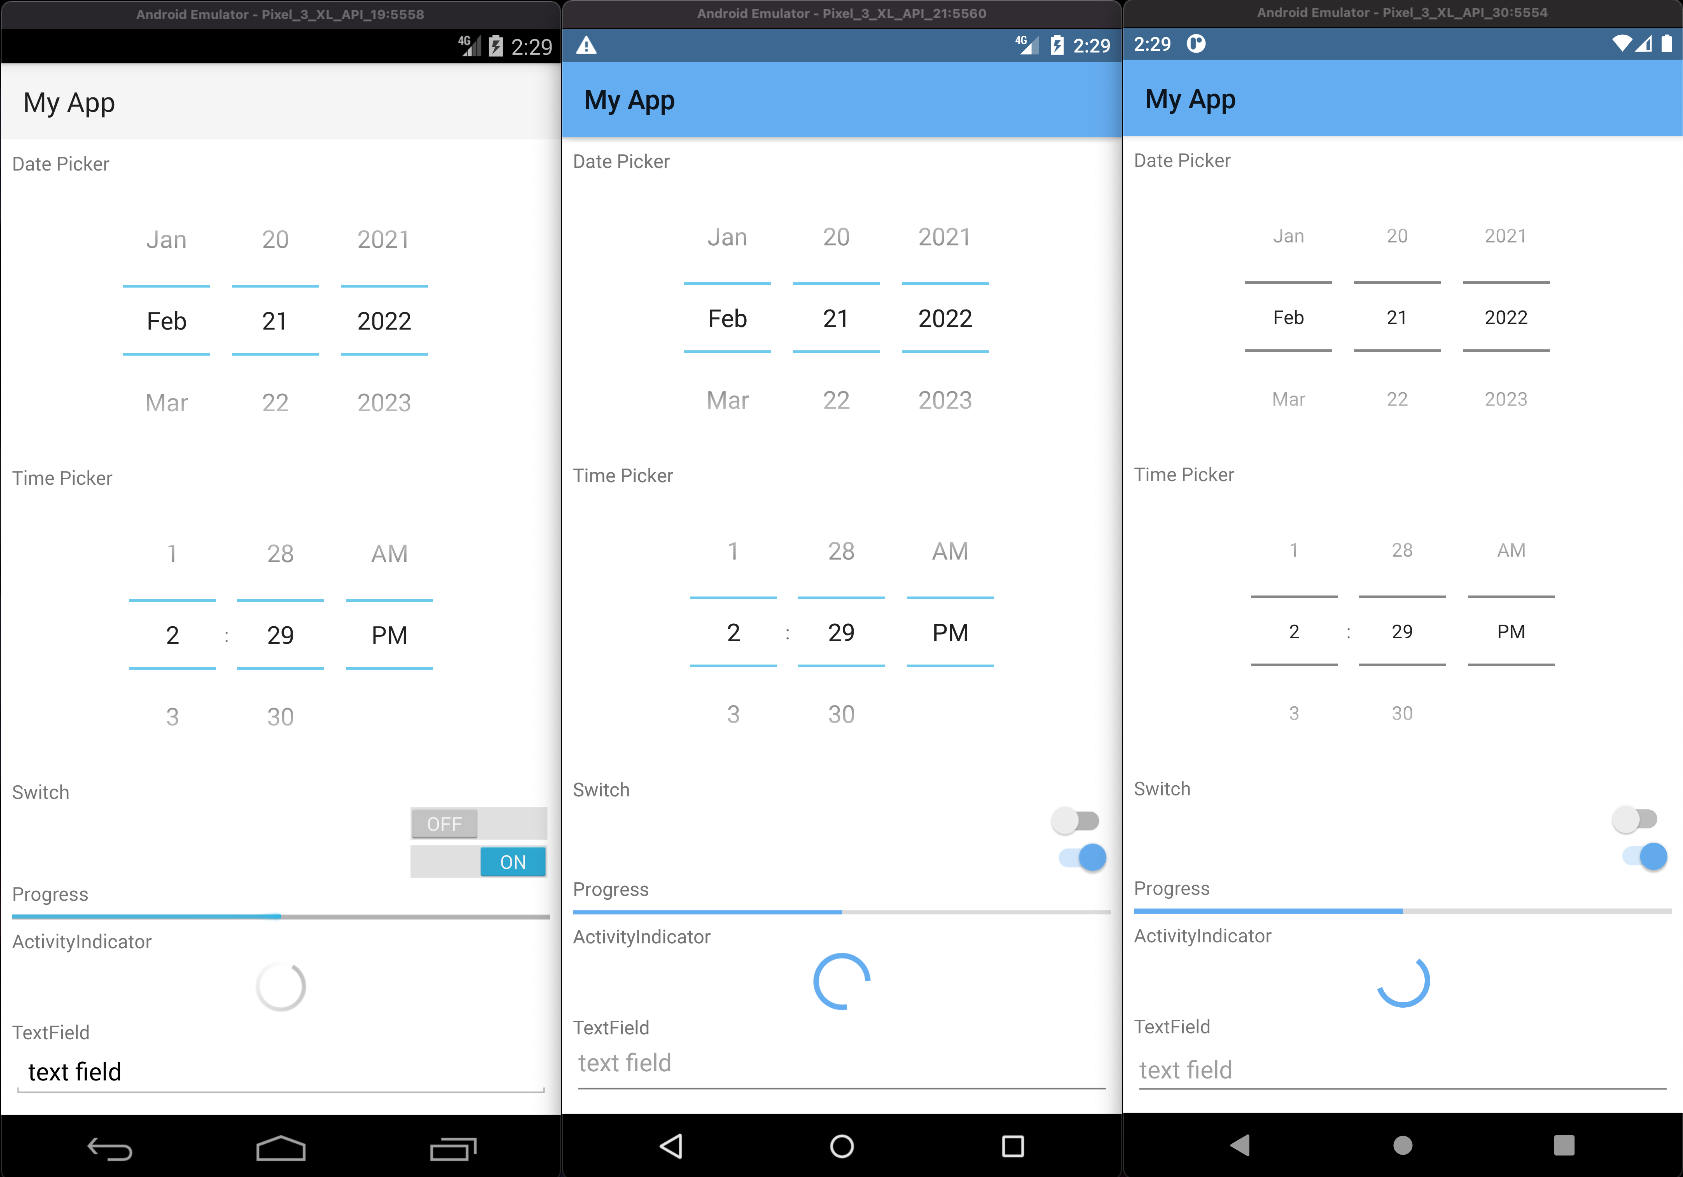
Changing the DatePicker to calendar mode
To change the mode of the DatePicker from the default spinner style, change android:datePickerMode in App_Resources/Android/src/main/res/values-v21/styles.xml:
<!-- Default style for DatePicker - in spinner mode -->
<style name="SpinnerDatePicker" parent="android:Widget.Material.Light.DatePicker">
  <!-- set the default mode for the date picker (supported values: spinner, calendar)  -->
  <item name="android:datePickerMode">calendar</item>
</style>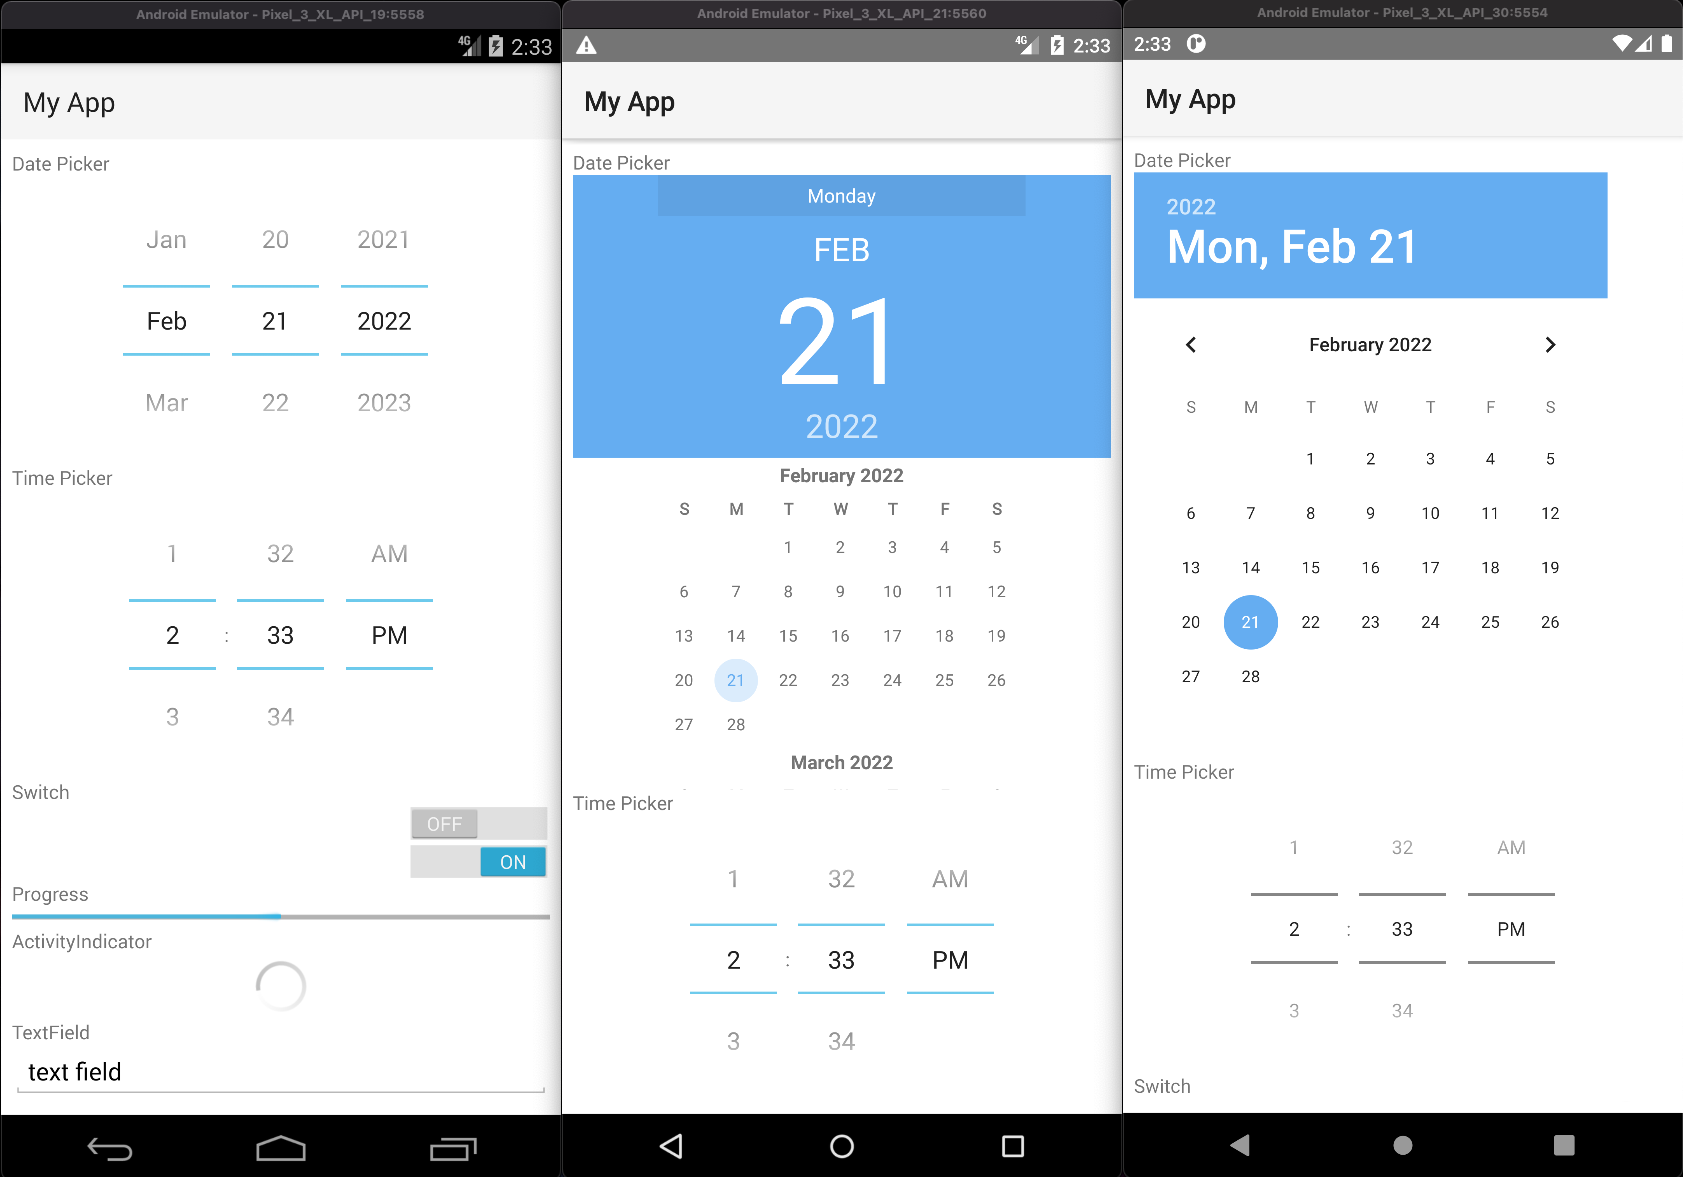
Changing the TimePicker to clock mode
To change the mode of the TimePicker from the default spinner style, change android:datePickerMode in App_Resources/Android/src/main/res/values-v21/styles.xml:
<!-- Default style for TimePicker - in spinner mode -->
<style name="SpinnerTimePicker" parent="android:Widget.Material.Light.TimePicker">
  <!-- set the default mode for the time picker (supported values: spinner, clock)  -->
  <item name="android:timePickerMode">clock</item>
</style>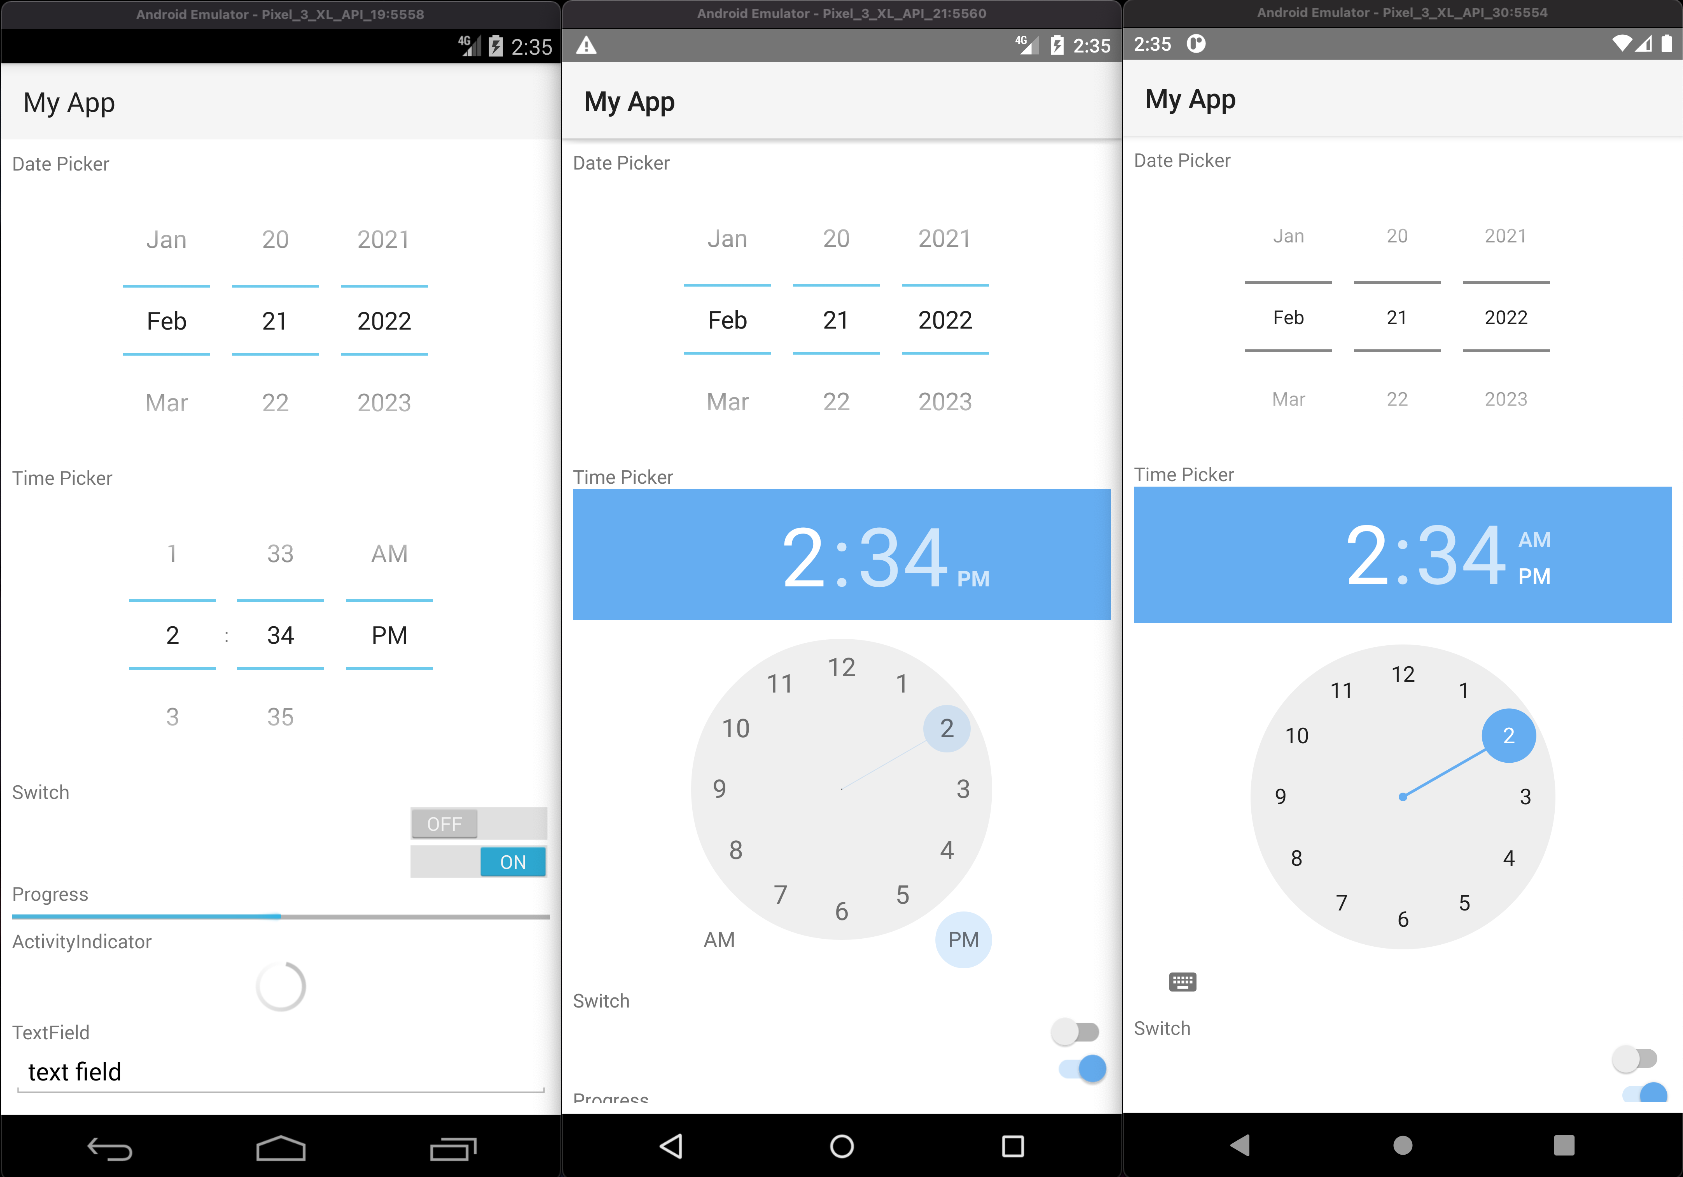
Enabling force Dark Mode
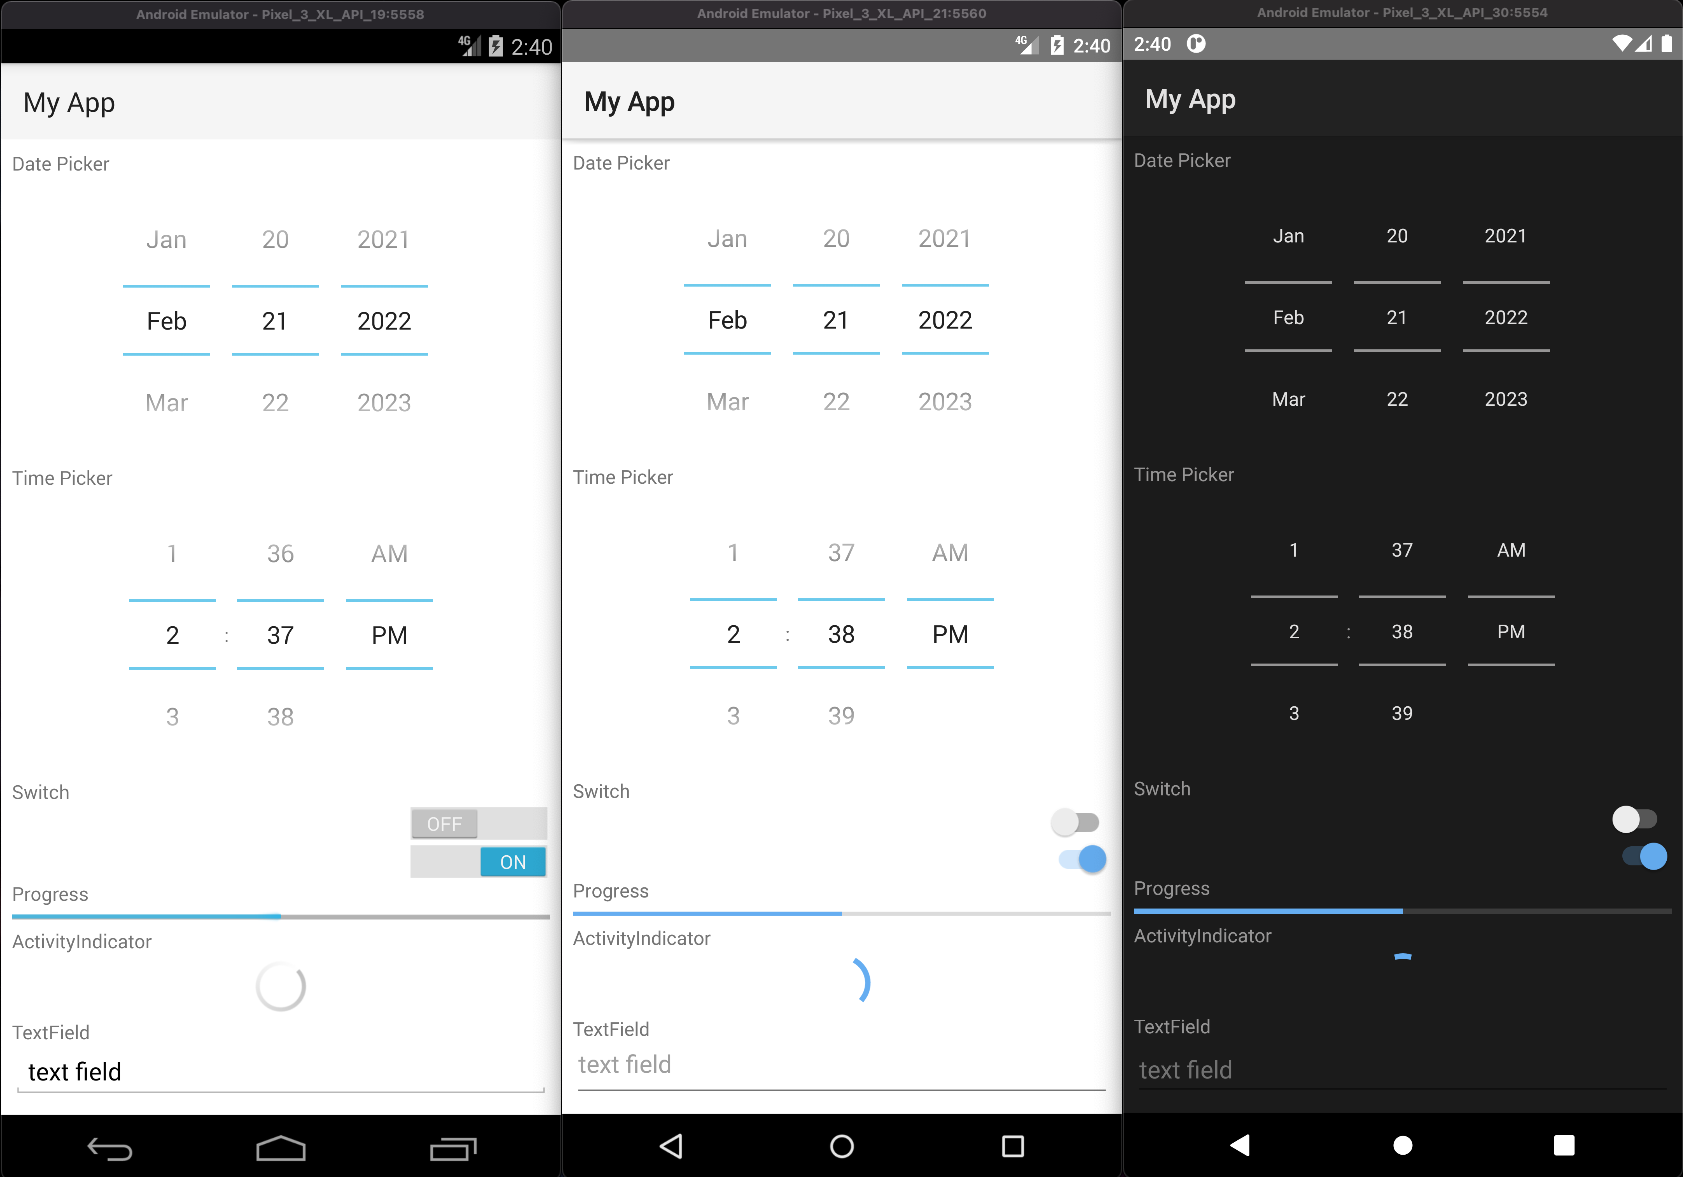
On API29+ apps can opt-in to a default Dark Mode when the system is set to use Dark Mode. This is turned off by default as it can lead to visual issues, since the automatic conversion may not display correctly in all cases.
To opt-in, change the android:forceDarkAllowed value to true in App_Resources/Android/src/main/res/values-v29/styles.xml:
<!--
  Disable forced dark mode on newer devices.
  Enabling this will make your app appear in dark-mode,
  but the way the app is converted may lead to visual issues
-->
<item name="android:forceDarkAllowed">true</item>
Note
If you enable android:forceDarkAllowed make sure you check if all the screens of you app look correct in the forced Dark Mode.
iOS specific resources
Most things on iOS are controlled directly through the app's template code however you can change the status bar style between dark (black text) or light (white text) by adding the following to your app's App_Resources/iOS/ Info.plist:
- Use white text on dark background:
<key>UIStatusBarStyle</key>
<string>UIStatusBarStyleLightContent</string>
<key>UIViewControllerBasedStatusBarAppearance</key>
<false/>- Use black text on light background:
<key>UIStatusBarStyle</key>
<string>UIStatusBarStyleDarkContent</string>
<key>UIViewControllerBasedStatusBarAppearance</key>
<false/>
iOS app display name
<key>CFBundleDisplayName</key>
<string>Your app name</string>
<key>CFBundleName</key>
<string>Your app name</string>
Adding custom entitlements
You can add custom entitlements to the App_Resources/iOS/app.entitlements
For a list of available entitlements refer to Apple's Entitlements documentation
Adding ObjectiveC/Swift Code to an application
See Adding ObjectiveC/Swift Code to an application.
Windows specific resources
Experimental
The Windows platform is experimental. See Developing for Windows.
App_Resources/
├─ Windows/
│  ├─ Package.appxmanifest   # package identity, display name, logos, capabilities
│  ├─ app.manifest           # Win32 application manifest (DPI awareness)
│  ├─ app.csproj             # MSBuild customizations (package references, properties)
│  ├─ before-plugins.props   # optional, imported before plugins
│  ├─ after-plugins.props    # optional, imported after plugins
│  └─ Assets/                # logos and splash screen images
└─ ... more
All files are optional, the Windows host project provides defaults. New projects created from the official templates include an App_Resources/Windows folder that you can copy into existing projects.
Package.appxmanifest
The package manifest defines the app's identity, display name, logos, capabilities and dependencies. Values from App_Resources/Windows/Package.appxmanifest are merged into the host project's manifest, with your values taking precedence. The __APP_IDENTIFIER__ and __PROJECT_NAME__ tokens are replaced with your app id and project name.
<Package ...>
  <Identity Name="__APP_IDENTIFIER__" Publisher="CN=My Company" Version="1.0.0.0" />

  <Properties>
    <DisplayName>Your app name</DisplayName>
    <PublisherDisplayName>My Company</PublisherDisplayName>
    <Logo>Assets\StoreLogo.png</Logo>
  </Properties>

  <Applications>
    <Application Id="App" Executable="$targetnametoken$.exe" EntryPoint="Windows.FullTrustApplication">
      <uap:VisualElements DisplayName="Your app name"
        Square150x150Logo="Assets\Square150x150Logo.png"
        Square44x44Logo="Assets\Square44x44Logo.png"
        Description="Your app description"
        BackgroundColor="transparent">
        <uap:DefaultTile Wide310x150Logo="Assets\Wide310x150Logo.png"/>
        <uap:SplashScreen Image="Assets\SplashScreen.png" />
      </uap:VisualElements>
    </Application>
  </Applications>

  <Capabilities>
    <rescap:Capability Name="runFullTrust" />
    <Capability Name="internetClient" />
  </Capabilities>
</Package>
Note
Keep the Application Id="App" and the runFullTrust capability, the CLI relies on them to launch the app.
Windows app display name
Set AppDisplayName (and optionally AppDescription) in App_Resources/Windows/app.csproj:
<Project>
  <PropertyGroup>
    <AppDisplayName>My App</AppDisplayName>
    <AppDescription>My Windows App, built with NativeScript.</AppDescription>
  </PropertyGroup>
</Project>
The display name is applied to both the package (<Properties>) and the app tile, Start menu and taskbar (<uap:VisualElements>) of the generated manifest. It defaults to the project name.
Capabilities
Declare the capabilities your app needs (for example webcam, microphone or location) in the <Capabilities> element of Package.appxmanifest.
Logos and splash screen
Images in App_Resources/Windows/Assets/ are copied into the app package and referenced from Package.appxmanifest. Provide the standard MSIX sizes (Square44x44Logo, Square150x150Logo, Wide310x150Logo, StoreLogo, SplashScreen, ...) with scale variants such as Square150x150Logo.scale-200.png.
To use different files, or to change the splash screen background color (#65ADF1 by default), set the corresponding properties in App_Resources/Windows/app.csproj:
<Project>
  <PropertyGroup>
    <SplashBackgroundColor>#FFFFFF</SplashBackgroundColor>
    <SplashImage>Assets\SplashScreen.png</SplashImage>
    <Square150x150Logo>Assets\Square150x150Logo.png</Square150x150Logo>
    <Square44x44Logo>Assets\Square44x44Logo.png</Square44x44Logo>
    <Wide310x150Logo>Assets\Wide310x150Logo.png</Wide310x150Logo>
    <StoreLogo>Assets\StoreLogo.png</StoreLogo>
    <LockScreenLogo>Assets\LockScreenLogo.png</LockScreenLogo>
  </PropertyGroup>
</Project>
Images in Assets/ can also be used from your app with res:// URLs, for example res://icon loads Assets/icon.png.
DPI awareness (app.manifest)
To render crisp text on high-DPI displays, the app must declare Per-Monitor V2 DPI awareness in an app.manifest:
<?xml version="1.0" encoding="utf-8"?>
<assembly manifestVersion="1.0" xmlns="urn:schemas-microsoft-com:asm.v1">
  <assemblyIdentity version="1.0.0.0" name="NativeScript.app" />
  <application xmlns="urn:schemas-microsoft-com:asm.v3">
    <windowsSettings>
      <dpiAware xmlns="http://schemas.microsoft.com/SMI/2005/WindowsSettings">true/PM</dpiAware>
      <dpiAwareness xmlns="http://schemas.microsoft.com/SMI/2016/WindowsSettings">PerMonitorV2</dpiAwareness>
    </windowsSettings>
  </application>
</assembly>
And reference it from App_Resources/Windows/app.csproj:
<Project>
  <PropertyGroup>
    <ApplicationManifest Condition="'$(ApplicationManifest)' == '' and Exists('$(MSBuildThisFileDirectory)app.manifest')">$(MSBuildThisFileDirectory)app.manifest</ApplicationManifest>
  </PropertyGroup>
</Project>
Adding native code to a Windows application
- Android specific resources
- Android app display name
- Adding native code to an application
- Setting the default color of the ActionBar
- Setting the default color of the status bar
- Setting the accent color
- Showing the app under the status bar
- Changing the DatePicker to calendar mode
- Changing the TimePicker to clock mode
- Enabling force Dark Mode
- iOS specific resources
- Windows specific resources
Contributors

